In this tutorial, I'm taking a brief look at opacity and blending modes in Photoshop and how you can create different image effects by using them. I'm not going to look at each of the blending modes – there are 23 of them – but more an overview of how they work.
When you blend layers you are changing the way pixels on the different layers mix with each other and this gives us some cool (and unusual) results. Blending modes can be a great way to compose multiple-image artwork.
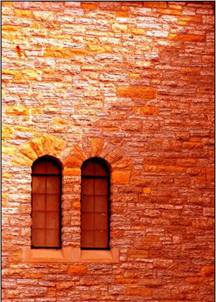
I'm using a Photoshop file that has two layers. One layer contains an image of an old building with an orange coloured wall and the other layer contains a staircase on the outside of an apartment block. When you're trying this out yourself, just use any Photoshop image with two different layers, with something on each layer.
It's always a good idea to give your layers a descriptive name. Don't just leave each layer with it's default of Layer 1, Layer 2, Layer 3 and so on. When you're dealing with an image with 20 layers this becomes very tiresome when you're trying to figure out what's on each layer.
Step 1
To rename a layer, double-click the layer name in the Layers palette. A bounding box will appear around the words Layer 1 . Type a new name and Press Return or Enter .
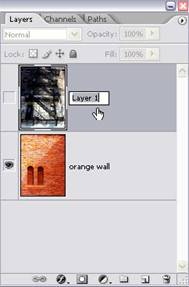
Note: Make sure you click directly on the layer name, otherwise you will open the Layer Style dialog box and you won't be able to rename the layer.
Step 2
When I click on the eye icon on the newly-named Stairs layers. The image of stairs appears in the image and the Orange Wall is hidden.
Step 3
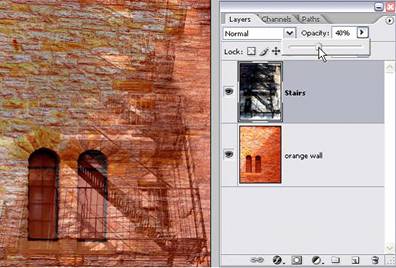
With the Stairs layer selected in the Layers palette, click on the arrow beside the opacity field and drag the slider to 40%. Notice that everything on this layer - the stairs and the wall they are attached to becomes less opaque (more see-through).
Step 4
Lowering the opacity of a layer makes the artwork on that layer more translucent, so that the layers beneath it show through.
Step 5
Drag the opacity slider back to 100% so that you can see the Stairs normally.
Step 6
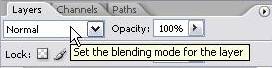
On the layers palette, click on the down arrow beside the field that says “ Normal”. By default, layer appear with a blending mode of Normal.
Step 7
From the drop down menu that appears, choose Hard Mix.
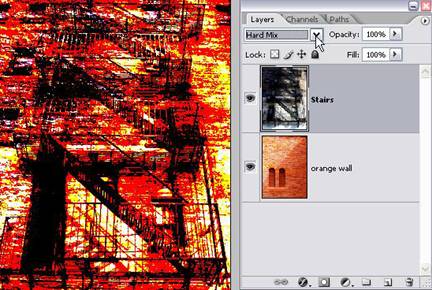
The image changes quite dramatically.
Take a few minutes to try out different blending modes and see how the image is affect. Below you can see Overlay and Multiply modes.

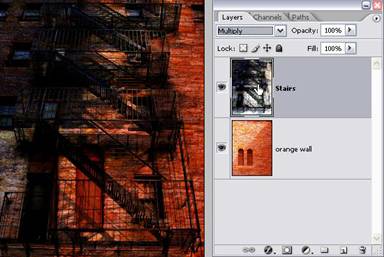
The Multiply mode is probably one of the most often used blending modes. It blends layers to produce a darker colour, except where there are white pixels. The white pixels will disappear.
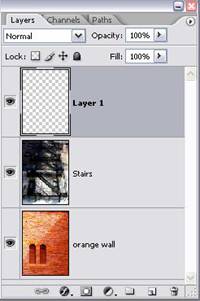
When you have found a blending mode that produces an effect you like, click on the Stairs palette to select it. Click on the “Create a New Layer” button at the bottom of the Layers palette.

A new empty layer appears in the Layers palette just above the Stairs layer, but nothing has changed on your image in the document window. When you add a new layer, by default the layer is empty and transparent. You're now going to use this new layer to draw a border around the image you've been working on. The benefit to drawing on this layer, as opposed to drawing on any of the other layers, is that it can be isolated on its own - turned on or off, transparency adjusted and other adjustments applied to the layer.
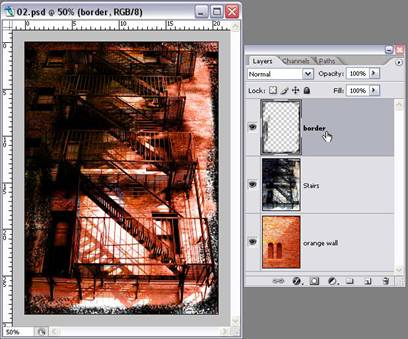
Make sure that the new empty layer is selected. Select the Brush tool from the Toolbox (or hit B on the keyboard). On the tool options bar, click on the Brush Preset Picker and select a rough looking brush. (I picked a Dry Brush Light Flow) and set the master diameter to about 100 pixels. On the toolbox, set the foreground colour to black by hitting “D” on the keyboard – this sets the foreground and background colours to their default – black and white. Start drawing around the edge of the image to create a rough border.
Rename the layer as “B order”. (Yes, I know I'm nagging about the naming of layers but it's good practice!)
The benefit to drawing on this new empty layer is if you don't like your work you can turn it off without affecting your entire image. You could also reduce the opacity to see how that looks.
Take some time to try adding another layer to your image and draw some more. Pick different brushes and colours and choose some blending modes.
So that's it for an intro to blending modes and opacity. The best way to find out how they work is, of course to experiment and check out all the different effects you can achieve.
Working With Photoshop Blending Modes & Opacity - Photoshop Tutorial
Labels: Photoshop
Subscribe to:
Post Comments (Atom)

0 comments:
Post a Comment