The dotted line is a very useful tool in graphic and web design for separating areas of information. If you've used Illustrator or InDesign, you'll know that it's simple to stroke a line so that it appears dotted. However, Photoshop doesn't offer this as a standard feature. I'm going to show you how you can easily create a dotted line by making a custom brush.
Step 1
Select the Brush tool from the toolbox.
Step 2
Open the Brushes palette by choosing Window > Brushes.
Step 3
Click on the pop-up menu at the top of the Brushes palette.
![]()
Choose Square Brushes from the list of brush types. You'll be asked if you want to replace or append the Square Brushes. Choose Append.
Step 4
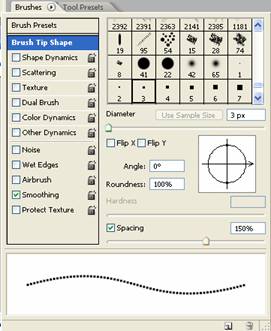
Choose the Hard Square 3 pixel brush tip.
Step 5
Drag the Spacing slider to 150%. You'll be able to see a preview of the line at the bottom of the brushes palette, so if you want more space between the “dots”, then drag the slider farther to the right.
Step 6
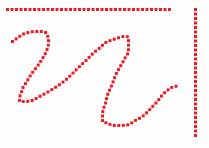
Once you've got your brush set up, you can start painting. Hold down the Shift key as you drag with the paintbrush to get a straight line.
How To Make A Dotted Line Brush In Photoshop
Labels: Photoshop
Subscribe to:
Post Comments (Atom)

0 comments:
Post a Comment