This post will show you how to start with Spring 3.0
It is just a sample HelloWorld example for beginners. Hope it will help you !!
Step 1:
The Spring 3.0 at least requires JDK 5. So, make sure you have JDK 5 or above. Open dos prompt if you are using windows and type java -version. This will display the version of Java installed on your machine as shown below:
java version "1.6.0_17"
Java(TM) SE Runtime Environment (build 1.6.0_17-b04)
Java HotSpot(TM) Client VM (build 14.3-b01, mixed mode, sharing)
Make sure you are using Ecllipse / RAD as desired
Step 2
Download the latest version of Spring 3 from http://www.springsource.org/download. For this tutorial we have downloaded spring-framework-3.0.0.RELEASE-with-docs.zip, which contains the documentation also. After extracting the file we got the following directories:

Step 3
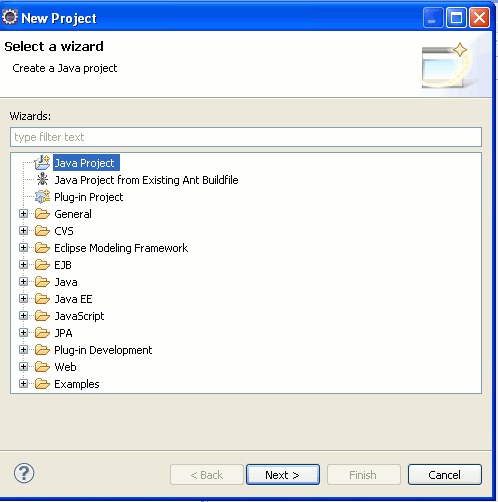
Now we will create a new project in Eclipse IDE and then add the library files.

Click next. Give any name to the project, say "Spring 3" and then click on the "Finish" button.

Eclipse will create a new project.
Step 4
Create a new folder "lib" in the project space to hold the Spring 3.0 libraries. Right click on the "Spring3" in the project explorer and then select new folder option as shown below:

Then in the next screen enter "lib" next to the "Folder name" text field and click on the "Finish" button.

Step 5
Now we will add the Spring 3. libraries to the project. Extract the "spring-framework-3.0.0.RELEASE-with-docs.zip" file if you have not extracted. Now go to the "dist" directory of the and then copy all the jar files (Ctrl+C) and paste on the lib directory (of our project) in the Eclipse IDE.

Then find the commons-logging.jar from extracted folder and also copy this file into Eclipse IDE. You will find this library into spring-framework-3.0.0.RELEASE-with-docs\spring-framework-3.0.0.RELEASE\projects\spring-build\lib\ivy folder.
Step 6
Now all all the libraries to "Java Build Path". Right click on the "Spring3" in project explorer and then select properties. Then select "Java Build Path" --> Libraries and then click on the "Add JARs" button. And add all the libraries to Java Build Path.

Then click on the "OK" button. This will add all the libraries to the project. Now we can proceed with our Spring 3 Hello World example.
Step 7
Create a new package net.testspring hold the java files. Right click on the "Spring3" and then select New --> Package. Then provide the package name as net.testspring click on the "Finish" button.

Step 8
Create a new Java file Spring3HelloWorld.java under the package net.testspring add the following code:
package com.testspringpublic class Spring3HelloWorld {
public void sayHello(){
System.out.println("Hello Spring 3.0");
}
}
In the above class we have created a method sayHello() which prints the "Hello Spring 3.0" on the console. In this section we will use the Spring framework to manage the Spring3HelloWorld bean, and then get the bean from the Spring runtime environment (Spring context) and the call the sayHello() method. In the next step we will xml file which will be used as Metadata to configure the bean.
Step 9
Now create a new xml (SpringHelloWorld.xml) file using Eclipse IDE.

<?xml version="1.0" encoding="UTF-8"?>
<beans xmlns="http://www.springframework.org/schema/beans"
xmlns:xsi="http://www.w3.org/2001/XMLSchema-instance" xmlns:aop="http://www.springframework.org/schema/aop"
xsi:schemaLocation="http://www.springframework.org/schema/beans http://www.springframework.org/schema/beans/spring-beans-3.0.xsd">
<bean id="Spring3HelloWorldBean"
class="net.testspring.Spring3HelloWorld" />
</beans>
The above xml file declares the spring bean "Spring3HelloWorldBean" of the class net.testspring.Spring3HelloWorld. The

Step 10
Now create a java file (Spring3HelloWorldTest.java) into net.testspring and add the following code:
package net.testspringimport java.util.Map;
import org.springframework.beans.factory.xml.XmlBeanFactory;
import org.springframework.core.io.ClassPathResource;
import org.springframework.util.Assert;
public class Spring3HelloWorldTest {
public static void main(String[] args) {
XmlBeanFactory beanFactory = new XmlBeanFactory(new ClassPathResource(
"SpringHelloWorld.xml"));
Spring3HelloWorld myBean = (Spring3HelloWorld) beanFactory
.getBean("Spring3HelloWorldBean");
myBean.sayHello();
}
}
In the above code we have created the instance of XmlBeanFactory and the retrieved the "Spring3HelloWorldBean". Then we can call the sayHello() method on the bean. The XmlBeanFactory class is extension of DefaultListableBeanFactory that reads bean definitions from an XML document. In our case it reads the bean definitions from SpringHelloWorld.xml file.
Step 11
To run the code in Eclipse open Spring3HelloWorldTest.java in the editor and then right click and select Run as --> Java Application. This execute the Spring3HelloWorldTest.java file and following output will be displayed in the console. Jan 1, 2010 6:49:57 PM org.springframework.beans.factory.xml.XmlBeanDefinitionReader loadBeanDefinitions INFO: Loading XML bean definitions from class path resource [SpringHelloWorld.xml] Hello Spring 3.0


1 comments:
Thanks it was helpful to setup the RAD workspace.
Post a Comment