Despite all that has been written about keeping the background of your photos simple, that goal is not always achievable. Sometimes your subject is in a place with a busy background everywhere. Or perhaps the subject is doing something that you don’t want to interrupt by walking around the person or requesting that she or he move to a different location.
I have found a very quick solution for such cases. Take the picture you want and then work on the background in Photoshop or another image editing program. First, I crop such images to remove part of the background. That alone makes the background somewhat less intrusive. But often I don’t want to eliminate it entirely; I merely want to de-emphasize it. One quick fix is first to blur the background slightly and then to adjust the saturation of both background and subject.
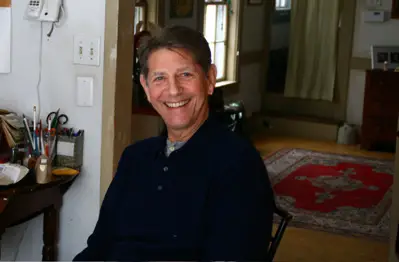 Recently, my brother came to visit. He and another friend of mine had an animated conversation in my kitchen. These were two very large guys and their expansive gestures and expressions really captured my interest. I grabbed a camera and took a whole series of pictures of them holding their conversation in my cluttered kitchen. The first picture shows enough of the background to distract from the person, my brother.
I began by cropping the image to remove part of the room behind my brother. This eliminated part of the bright red rug with its distracting pattern. Then I used the lasso tool to select my brother and a bit of the nearby background. I feathered the edge by about 40 pixels. Then I went to the SELECT menu and chose Inverse. Everything except my brother and a small space around him was now selected.
Next, I went into the FILTER menu and choose the Gaussian Blur from the Blur command. I fiddled with it until I liked how it looked, a little blurry but still recognizable. Then I clicked on the Sponge Tool, which is stacked behind the Dodge and Burn tools. When you click the Sponge tool, you can select one of two modes in the Options bar above the image: saturate or desaturate.
I chose desaturate, and I desaturated by 15%. Using a large, soft brush, I desaturated the blurred background until it faded just a little. This had the effect of drawing attention away from the colored pencils on the table beside my brother, as well as the red rug behind him.
 Finally, I went back to the SELECT menu to deselect and then went back to the Sponge Tool and changed it to Saturate. I saturated just a small amount, 8%, and used the tool to saturate my brother’s hair, cheeks, eyes, and shirt. This helped make him stand out a bit more from the background. The resulting picture was far more pleasing, I thought, than the original.
All in all, the process took perhaps 6-7 minutes. To shorten that even more, try merely desaturating the background. In a color image, this has a greater effect than the blurring. If you want to see examples of pictures that were edited using only desaturation.

0 comments:
Post a Comment